| |
|
|
| |
 |
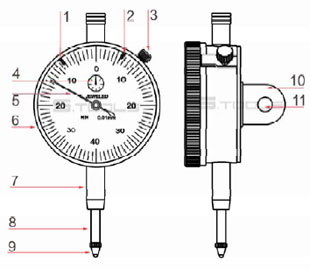
1-Left adjustable limit hand (inside type)
2-Right adjustable limit hand (inside type)
3-Bezel locking screw
4-Samll pointer and revolution counter
5-Large pointer
6-Bezel
7-Shank
8-Plunger
9-Measuring tip head
10-Plug
11-Mounting hole |
1. Clean the measuring tip gently before use. Remove cutting chips, dust, burrs and other foreign substances from the piece to be measured.
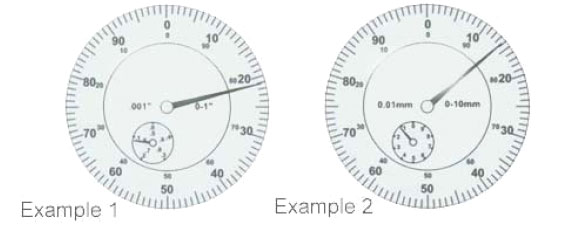
2. Reading Example 1:
- Dial face has dual directional graduation of 0.001".
- Revolution counter is graduated in 0.1". One full revolution of large pointer is one increment of revolution counter.
The small pointer is between '. 1' and '. 2' or between '.6' and '.7'=0.1" or 0.6"
The large pointer is close to line ' 21' of black digit=0.021"
So the reading is 0.1"+0.021"=0.121" or 0.6"+0.021"=0.621"
3. Reading Example 2:
- Dial face has dual directional graduation of 0.01mm.
- Revolution counter is graduated in 1mm. Once full revolution of large pointer is one increment of revolution counter.
The small pointer is between ' 1' and ' 2'=1mm
The large pointer is close to line ' 14' of black digit=0.14mm
So the reading is 1mm+0.14mm=1.14mm

4. Setting up:
- Inch type has 3/8" diameter shank and 1/4" diameter mounting hole,
Metric type has 8mm diameter mounting hole. The shank or the mounting hole can be fixed on magnetic bases.
- Position measuring tip head against the piece to be measured so that it is depressed slightly. Plunger should be perpendicular to the surface being measured.
- Loosen bezel locking screw and rotate bezel till large pointer points at zero. Tighten bezel locking screw to lock the bezel at its new position.
5. Move the left limit hand to the position of lower limit and the right limit hand to the position of upper limit, It can be found easily if the large pointer is our of limit.
6. Measuring tip head should be carefully prevented from being hit. Do not operate abruptly, drop or strike dial indicators | |
|
|
|
|
|